Fix: QTTabBar Tabs Unable to Be Placed at the Top of Windows 11 File Explorer After an Update

After a Windows 11 update, my QTTabBar-enhanced File Explorer started crashing. Once relaunched, I couldn’t move the QTTabBar tabs or command bar to the top anymore.

In QTTabBar’s options, only these showed up: “Extra View (Left)”, “QT Command Bar (Vertical)”, “Extra View (Bottom)”, and “QTTabBar – Bottom”:
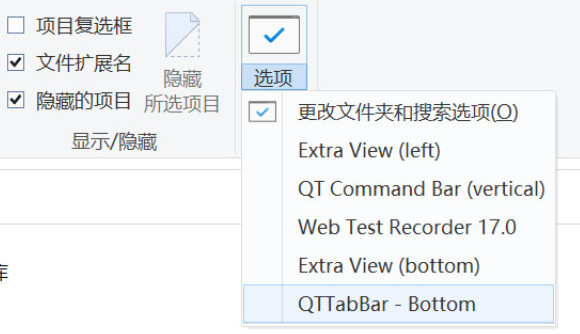
not as usual:

Tried the online advice: Control Panel > Internet Options > Programs tab > Manage add-ons > Enable all QTTabBar-related plugins (like QT Command Bar 2, QT Base Toolbar, Extra View (left)). Restarted the OS. Still nothing.

This seems tied to the Windows 11 update, likely enabling feature ID 57048216, which breaks third-party toolbars like QTTabBar from displaying or pinning to the top. Disabling it restores compatibility. Here’s how:

  1. Grab the latest ViVeTool from GitHub: https://github.com/thebookisclosed/ViVe/releases — download the ZIP (e.g., ViVeTool-v0.x.x.zip).
  2. Extract to a folder, say C:\ViVeTool.
  3. Open Command Prompt as admin (Win + S, search “cmd”, right-click > Run as administrator).
  4. CD into the folder: cd C:\ViVeTool (adjust your path).
  5. Run: vivetool /disable /id:57048216
    If you’ve previously disabled native tabs, repeat for these IDs to be sure: 39145991, 36354489, 37634385. E.g., vivetool /disable /id:39145991
  6. Reboot.
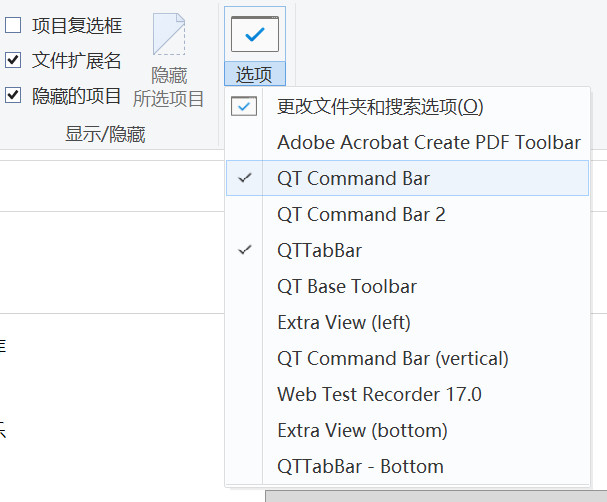
  7. Open File Explorer, go to View > Options, and check if the QTTabBar option appears. If so, enable it.

Worked like a charm — tabs back on top!

If it doesn’t fix things, roll back by swapping /disable with /enable and re-running.

Windows 11更新系统后导致QTTabBar选项卡无法置于资源管理器顶部的解决方法

Windows 11更新系统后导致使用了QTTabBar的资源管理器奔溃,然后我重新打开资源管理器,发现无法将QTTabBar选项卡和命令栏移到资源管理器的顶部。

在QTTabBar的选项中,只有“额外视图(左侧)”、“QT 命令栏(垂直)”、“额外视图(底部)”和“QTTabBar – 底部”这几个选项:

没有正常的“QTTabBar”等选项:

我已经尝试恢复QTTabBar的默认设置,也卸载并重新安装过QTTabBar的最新版(2048版本)1043版本,都没有解决这个问题。

我按照网上的教程:依次打开控制面板->Internet选项->“程序”选项卡->管理加载项->启用所有QTTabBar加载项,即全部启用与 QTTabBar 相关的插件,例如 QT Command Bar 2、QT Base Toolbar、Extra View (left) 等,然后重启操作系统后,还是没有解决这个问题。

Windows 11更新系统后导致了这个问题,因此这个问题很有可能与Windows 11更新有关。Windows 11更新可能启用了ID 57048216的功能,导致第三方工具栏(如QTTabBar)无法显示或置顶。禁用它可恢复兼容性,步骤如下:

1 从GitHub下载ViVeTool最新版:https://github.com/thebookisclosed/ViVe/releases,下载ZIP文件(如ViVeTool-v0.x.x.zip)。

2 解压到任意文件夹(如C:\ViVeTool)。

3 以管理员身份打开命令提示符(按Win + S搜索”cmd”,右键“以管理员身份运行”)。

4 导航到解压文件夹:输入cd C:\ViVeTool(替换你的路径)。

5 执行命令:

vivetool /disable /id:57048216

如果之前已禁用原生标签,也可重复禁用这些ID以确保:39145991、36354489、37634385。命令如vivetool /disable /id:39145991等。

6 重启电脑。

7 打开资源管理器,检查View > Options中是否出现QTTabBar选项(顶部)。如果出现,勾选它。

按照步骤操作后,ViVeTool解决了这个问题,QTTabBar选项卡又可以置于资源管理器的顶部了!

注意,如果ViVeTool也不能解决这个问题,用/enable替换/disable重新执行上述命令回滚这些变更。

参考

https://blog.csdn.net/zxfrdas/article/details/51174382

http://qttabbar.wikidot.com/forum/t-1637257/can-t-move-qt-command-bar-and-qttabbar-to-the-top

Windows 10或Windows 11有两个硬盘,但重装系统后在“此电脑”里只显示一个的问题及解决方法

右键点“此电脑”->系统工具->设备管理->磁盘驱动器,看看里面是否有两个硬盘驱动,如果是,说明第二块磁盘驱动没有问题,再打开存储->磁盘管理,右键点击第二块磁盘->更改驱动器号和路径,设置一下驱动器号,就可以在资源管理器的“此电脑”路径下出现了。

How to Restore Files Deleted by Windows Defender on Windows 10 and Windows 11?

For Windows 10:
1.Open Windows Security Center
2.Go to Virus & threat protection
3.Navigate to Threat history
4.Check the Detected threats
5.Select Restore

For Windows 11:
1.Open Windows Security Center
2.Go to Virus & threat protection
3.Navigate to Protection history
4.Check the Quarantined threats
5.Select Restore

Important Note
Restoring quarantined files requires administrative privileges on your Windows system.

Windows10和Windows11如何还原被Windows Defender删除的文件?

对于Windows10:

打开Windows安全中心->病毒和威胁防护->威胁历史记录->检查出的威胁->还原

对于Windows11:

打开Windows安全中心->病毒和威胁防护->保护历史记录->已隔离威胁->还原

注意事项

在还原被隔离的文件时,需要你有Windows系统的管理员权限。

Windows11更新后闪屏问题的解决方法

今天我更新Windows11系统并重启后,电脑屏幕出现了闪烁问题。

我检查显卡驱动,无论是Nvidia显卡驱动还是Intel显卡驱动都是最新的。那么问题出在哪里?

我猜测是因为我的操作系统是从Windows10升级而来,之前Windows10下某些Intel显卡驱动的隐藏设置(配置)在Windows11下与新版本的显卡驱动不兼容所致。

因此,我使用Display Driver Uninstaller (DDU)彻底卸载Intel显卡驱动后,再重装最新版本的Intel显卡驱动,就解决了电脑屏幕闪烁问题!

注意,安装最新版本的Intel显卡驱动程序时需要以管理员身份运行安装程序。

最新版Intel显卡驱动官网下载地址:

https://www.intel.com/content/www/us/en/download/19344/intel-graphics-windows-dch-drivers.html

最新版DDU官网下载地址:

https://www.wagnardsoft.com/display-driver-uninstaller-ddu-

参考

https://bbs.pcbeta.com/viewthread-1944975-1-1.html

How to Fix Screen Flickering Issue After Windows 11 Update

Today, after updating my Windows 11 system and rebooting, I encountered a screen flickering problem.

I checked both my Nvidia and Intel graphics drivers, and they were up to date. So where was the issue?

I suspected that the problem arose because my system had been upgraded from Windows 10 to Windows 11. Some hidden settings or configurations from the older Intel graphics drivers on Windows 10 might have been incompatible with the newer drivers on Windows 11.

To resolve the issue, I used Display Driver Uninstaller (DDU) to completely remove the Intel graphics driver. Afterward, I reinstalled the latest version of the Intel graphics driver, and the screen flickering problem was fixed!

Note: When installing the latest Intel graphics driver, make sure to run the installer as an administrator.

Download the latest Intel graphics driver here: https://www.intel.com/content/www/us/en/download/19344/intel-graphics-windows-dch-drivers.html

Download the latest DDU here: https://www.wagnardsoft.com/display-driver-uninstaller-ddu-

Reference
https://bbs.pcbeta.com/viewthread-1944975-1-1.html